HotDoodle Logo
Login and Registration

The Login Block allows you add a registration and login feature to your site. This feature is only offered on the Dynamic and Powerhouse hosting plans. A login is a security feature that requires visitors to enter a username and password before entering areas of your site. The registration process establishes the username and password. Having users login is useful for tracking visitors, generating revenue from your website, and maintaining private content or pages. You can offer additional content to a visitor in exchange for his or her contact information (provided at registration). You can also charge visitors for the content in certain areas of your site. The Login Block includes the following functions:

  • Allow a User to register
  • Allow a user to login
  • Send a thank you email
  • Add the user to specific groups (automatically or upon your approval)
  • Copy and rename pages and assign user access to them

For a Login Block to function properly and display registration, Registration has to be enabled at the site level.

Steps: How to Enable Registration at the Site Level

1. From the HotDoodle Toolbar, click on the "Administration" tab.

2. Click on the "Configure Site" button.

3. Click on the "Site Identification" button on the Site Preferences Menu screen.

4. At the bottom of the screen uner Site Access, click to add a checkmark next to "Allow Registration?".

5. Click on the "Save" button.


Add a Login Block and Registration

Steps: How to Add a Login Block and Registration

1. On the HotDoodle Toolbar, click on the "Block" tab.

2. Click on the "Add Block" button.

3. On the webpage, click on the "Add Here" button where you would like to add the Login Block.
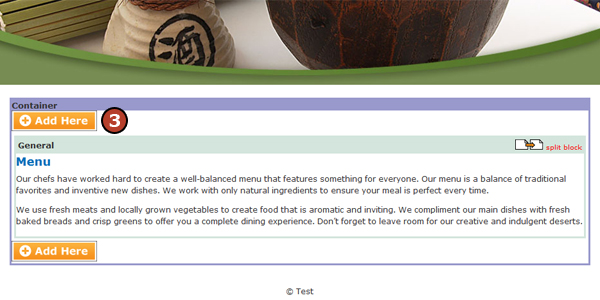
4. Click on the "Login Block" under More Blocks.
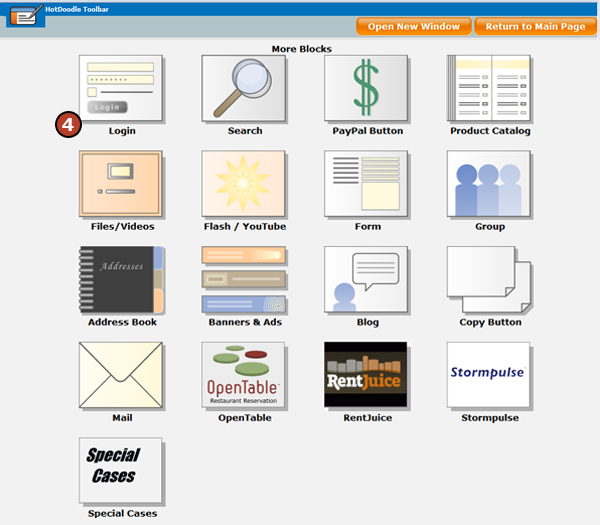
5. Click the "Insert this block" button.
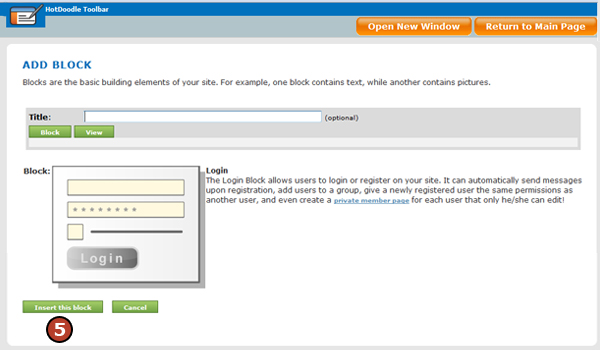
6. Configure the Login Block Functionality – Use the drop downs under the "What to Include" to set whether your block includes login and registration or just the login, and the order of the functions. You can also determine the orientation of the block, either vertical or horizontal. 

7. Configure the Login Behavior and Behavior – Use this section to determine the wording of the login area and whether or not to display the “remember me” and “forgot password” functions. 

8. Configure the Actions to Take – Use the drop down or text entry in this section to set the page the user is taken to in your website after login. 

9. Configure the Status Shown – Use this section to set whether or not the site indicates if a user is logged in and if the join groups options appear. 

10. Configure Registration Appearance – Complete this section if you are including registration in the Login Block. Choose the type of registration form and the title of the registration box. For more explaination see Registration Styles

11. Personal Member Pages – Complete this section if you want to create a personal page for new users. Select the page to copy and the location the page appears within your site hierarchy. You can also opt to have the person inherit the rights of other users or groups. See Member Pages

12. Automatic Email Response – Use this area to create the automatic email response for registration. Type the email subject line and enter the message text in the text area. You can use the fields listed below the text area to personalize the message.
13. Click the "Save" button.

To preview how the Login and Registration displays to a visitor, fully logout of HotDoodle. Even the preview mode of HotDoodle may not fully display the Login and Registration; therefore, logging out fully is the most accurate view of what visitors will see on the website.


Set an Age Requirement

An age requirement for accessing certain site content can be implemented. If an age limit is set at any point, all registration forms will request a month and year of birth (the day is not requested). All users who have not entered a month and year will be asked to enter one when they login next and will not be able to see any main area content until this information is provided.

Steps: How to Set an Age Requirement

1. From the HotDoodle Toolbar, click on the "Administration" tab.

2. Click on the "Configure Site" button.

3. Click on the "Site Identification" button on the Site Preferences Menu screen.

4. Under Site Access at the bottom, enter a number in the Age Restriction field.

5. Click on the "Save" Button.


© 2006 - 2015 Metabyte, Inc., All Rights Reserved, Patents Pending

http://www.hotdoodle.com, HotDoodle™ Custom Web Design and Quality Affordable Website Designers for Small Businesses and Professionals
Powered by http://www.hotdoodle.com, HotDoodle™ Custom Web Design and Quality Affordable Website Designers for Small Businesses and Professionals
Business Website Designers for Business Sites You Edit Site Map